
Many users including many gamer’s, have been won over by Windows 11’s new design language, but more gamer are still waiting and watching because they are skeptical whether Windows 11 will enhance their gaming experience.
It is advised that you use the 7 choices listed below to optimize Windows 11 for improved gaming performance if you insist on upgrading to the new operating system in order to assure a realistic gaming experience.
To Improve Gaming Performance on Windows 11, follow these steps.
- “Enhanced pointer precision” Should be disabled.
- Activate game mode.
- Remove the checkbox for “Record what happened.”
- Enable Task Manager and Disable any unwanted Program’s.
- Modify the Power strategy.
- For particular Applications, alter the GPU priority.
- Turn off VBS.
Read : Does Windows 10 & 11 New Recent Updates Worth? December 2022
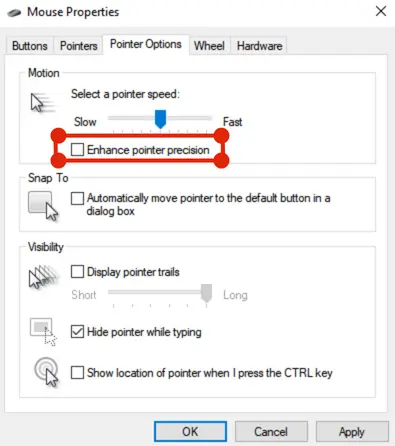
Method 1: “Enhanced pointer precision” Should be Disabled.
To make the track pad on a laptop more functional, turn on Windows 11’s “Enhanced pointer precision” feature. To guarantee a better gaming experience on a desktop computer, it is advised that you turn off this feature in Windows 11.
Step 1: Open the search box by pressing Windows+S, entering “mouse settings,” and selecting the mouse settings option that appears below the best comparison.
Step 2: On the right panel, locate the Related settings section and select Additional mouse options.
Step 3: Select the Pointer Options tab from the Mouse Properties window’s top.
Step 4: Remove your check-mark from the Enhance pointer precision checkbox under Motion.
enhance-pointer-precision
Method 2: Activate Game Mode.
The Windows game mode was once a function that wasn’t very useful and may harm your machine by causing input delays, for example. However, Microsoft has recently begun to pay attention to this function and has made some focused improvements, making it better in Windows 11.
It is advised that you Activate this feature to stop Windows from Automatically popping up any notifications, drivers, and updates to preserve a better gaming experience without impacting the performance of the game.
Please take note: Game mode is typically turned on by default, but you may disable it if you’ve had poor performance in the past. To be sure, check to see whether it’s turned on.
Step 1: Open the search box by pressing Windows+S, entering “game mode,” and selecting the best comparison.
Step 2: Make sure the game mode option is selected in the right panel of the game mode configuration window.

turn-on-game-mode
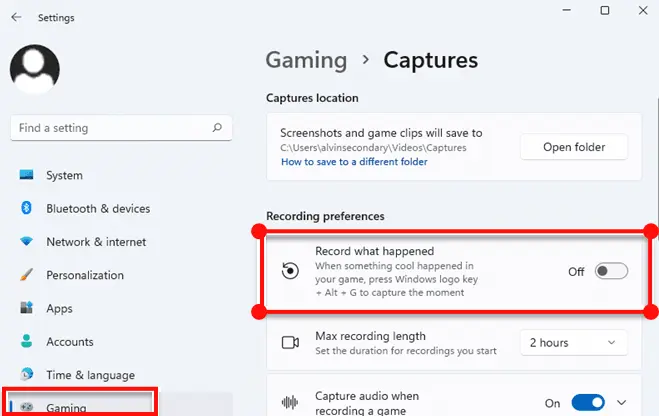
Method 3: Remove the checkbox for “Record what happened.”
To Avoid conflicts and minimize game performance loss, you must disable similar functionality integrated into Windows 11 since NVIDIA or AMD graphics cards can record the exciting events occurring in the game.
Step 1: Open Windows 11 settings, and click Gaming > Captures.
Step 2: Locate and turn off the Record what happened option in the Captures window’s Recording Preferences section.
Gaming Captures
Method 4: Enable Task Manager and Disable any unwanted Program’s.
Your Windows computer’s gaming performance may decline as a result of the frequent addition of new applications to the system and their covert startup launches, which will have an impact on your gaming experience. You must therefore disable unused programs during boot, for this reason.
Step 1: Use ESC+Shift+Ctrl to open Task Manager and switch to the Startup tab at the top.
Step 2: Then restart your computer. Select any unwanted applications, then click the Disable option in the bottom right corner.

disable-unnecessary-applications
Also Read : Windows 11 update, VPN Status Indicator is Being Added to the Taskbar
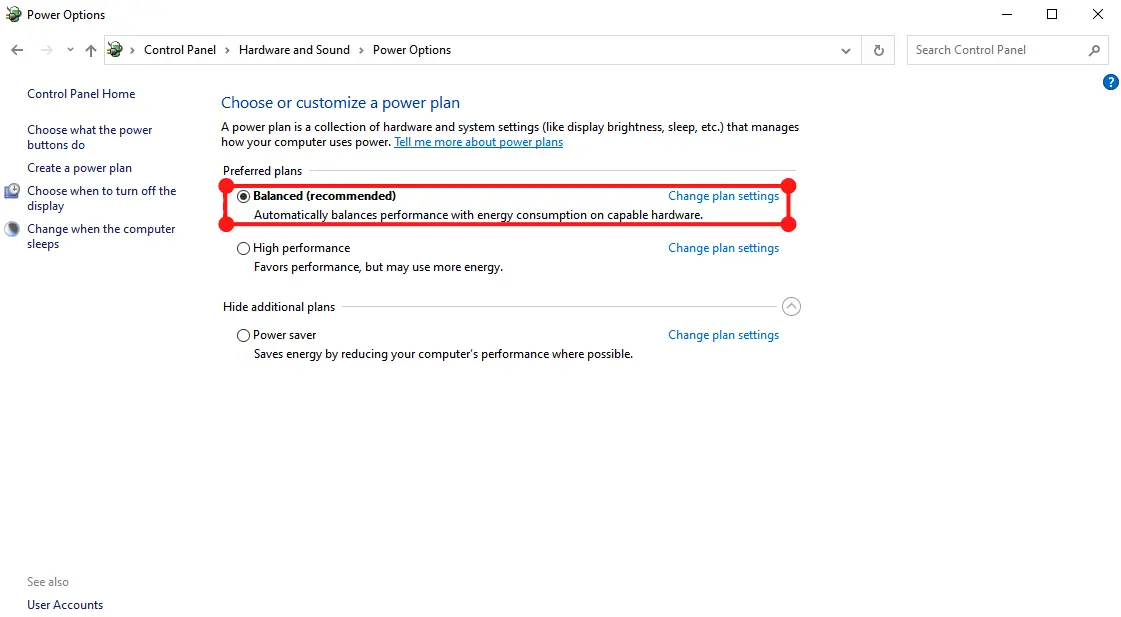
Method 5: Modify the Power strategy
If you are using a laptop, make sure to adjust the power plan, which will significantly enhance the computer’s ability to play games when it is not plugged in.
Step 1: use Windows + S to open the search box, enter the power plan, and click below the settings to select Power Options.
Step 2: Choose the power plan that best suits your needs from the list of Preferred plans below; in this case, Balanced is advised.
change-power-plan
Method 6: For particular Applications, Alter the GPU Priority.
Since desktop PCs typically only have one graphics card, changing the GPU priority is not really useful. The performance of different graphics cards has a huge impact on gaming, yet the majority of laptop computers have two graphics cards (integrated and discrete). Therefore, in order to provide a satisfying gaming experience in Windows 11, you must modify the GPU priority for particular applications.
Step 1: Go to Settings in Windows 11 and select System > Display > Graphics.
Step 2: In the list of the graphics window, select the application you want to change the GPU options for, and click the Options button.

change-the-gpu-priority-of-a-specific-application
Step 3: In the Graphics preference window, switch to High performance and click the Save button.
Method 7: Turn off VBS.
A new feature in Windows 10 called virtualization-based security (VBS) improves system security by virtualizing hardware and software to create an isolated subsystem that can successfully stop malware from harming your computer. This function, however, is unfriendly to gamer’s and will negatively affect your ability to play games, lowering the average frame rate by as much as 28%.
It is advised that you disable the VBS feature to provide a satisfying game experience. First, confirm that Windows 11 has VBS deactivated.
Check Whether VBS is Disabled or not
Step 1: Use Windows+S to open the search box, type in System Information and tap the System Information option below the best comparison.
Step 2: Locate Virtualization-based security in the right panel of the System Information window to see if VBS is turned off.

check-vbs
Step 3: If it shows not enabled, you do not need to disable it; if it shows enabled, please click the following two methods to disable it.
Disable VBS from Windows Settings
Step 1: Click on Windows 11 Start Menu button and select Settings from the list of apps. Click on Privacy & Security in the left panel.
Step 2: Select Device security in the new window that appears after clicking the Windows Security option at the right panel’s top.
Step 3: Click the Core isolation information button next to Core isolation in the Device security window.
Step 4: Find the Memory integrity area in the new window that appears, deactivate this option, and then restart your machine.

turn-off-memory-integrity
Disable VBS from the Registry Editor
Step 1: Use Windows+R to open the Run window, type regedit, and then click the OK button.
Step 2: Navigate to the following path.
HKEY_LOCAL_MACHINE/System\CurrentControlSet\Control\DeviceGuard
Step 3: In the right panel, find and double-click EnableVirtualizationBasedSecurity to open it, change the value to 0 in the numeric information section, and click the OK button to restart your computer.

disable-vbs-from-the-registry
Read More: Should I Upgrade My Windows 10 To Windows 11 For Gaming?
Sharing is Caring, don’t forget to share POST with your friends


[…] Also Read :Here’s How to improve Windows 11’s Gaming Performance […]
[…] Read: 7 Easy Methods to improve Windows 11’s Gaming Performance […]
[…] Read: 7 Easy Methods to Improve Windows 11’s Gaming Performance […]